How to Configure and Optimize a Dual Monitor Setup in Windows 10
Boost your productivity by expanding your screen real estate with this step-by-step guide to connecting and configuring dual monitors.
1. Make the Physical Connections
Connecting a second screen to your Windows 10 computer can dramatically improve your multitasking efficiency. Before adjusting any software settings, you must physically connect the monitor to your computer. Look at the back of your PC or the sides of your laptop to identify the available video output ports. Common ports include HDMI, DisplayPort, USB-C, and older standards like DVI or VGA. Ensure you have the appropriate cable, plug one end into your computer, and connect the other end to the secondary monitor.
Once the physical connections are secure, power on the secondary screen. In most cases, Windows is designed to detect and install new hardware automatically upon connection, eliminating the need for manual configuration steps right away. If your system recognizes the display immediately, you will see your desktop background or a mirrored image appear on the second screen.
Sources: support.microsoft.com
2. Arrange Your Displays in Windows 10
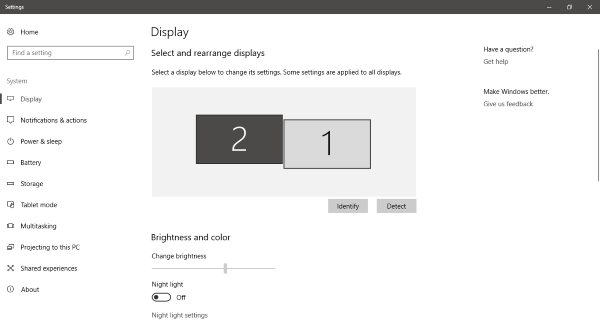
Once both screens are on, you need to tell Windows 10 where they sit physically on your desk so that your mouse cursor moves seamlessly between them. To do this, right-click on an empty space on your main desktop and select "Display settings" from the context menu. This action opens the display customization window, where you will see a visual representation of your monitors labeled with numbers like "1" and "2".
If you are unsure which box corresponds to which physical screen, click the "Identify" button. A large number will temporarily appear on each monitor. Click and drag the numbered boxes in the settings window to match their actual physical arrangement on your desk. For example, if your secondary monitor is positioned to the left of your primary screen, drag box "2" to the left of box "1". Once you are satisfied with the layout, click the "Apply" button to save these changes.
Sources: support.microsoft.com
3. Choose Your Display Mode
With your screens arranged, you must decide how Windows 10 should project your desktop across them. Under the display settings menu, scroll down to find the "Multiple displays" drop-down menu. Here, you will find several options, the most common being "Extend these displays" and "Duplicate these displays."
Choosing "Duplicate these displays" mirrors your primary screen onto the second monitor, which is highly useful for presentations or sharing your screen with an audience. However, for everyday productivity, "Extend these displays" is the preferred option. This choice treats the second monitor as an expanded canvas, allowing you to drag different windows, apps, and browser tabs from one screen to the other. You can also quickly toggle between these display modes at any time by pressing the Windows logo key + P on your keyboard.
Sources: support.microsoft.com
4. Adding Unrecognized Monitors Manually
Sometimes, your computer might not recognize the second screen immediately after you plug it in. Depending on your specific graphics card drivers and hardware configuration, detection results can vary. If your secondary monitor remains black or displays a "No Signal" message, you can attempt to force Windows to search for the hardware manually. Within the Display settings menu, look for the "Detect" button located directly beneath the visual display diagram and click it to prompt a refresh.
If the display still is not recognized, you can navigate to the broader hardware settings. In Windows 10, select Start > Settings > Devices > Bluetooth & other devices. From this screen, select "Add Bluetooth or other device" and follow the on-screen prompts to manually search for and install your newly connected accessory. Ensure that your secondary monitor is turned on and properly connected to its power source during this process.
Sources: support.microsoft.com
5. Fine-Tune Resolution and Scale
After successfully extending your desktop, you may notice that text looks too small on one screen or that the resolution seems blurry. Because monitors come in various sizes and resolutions, you will want to adjust the visual scaling individually for each display. In the Display settings window, click on the numbered box corresponding to the screen you want to adjust.
Scroll down to the "Scale and layout" section. Here, you can change the size of text, apps, and other items using the drop-down menu (common options include 100%, 125%, or 150%). Additionally, ensure that the "Display resolution" drop-down menu is set to the "Recommended" setting for each specific monitor. This ensures that both screens display images at their native resolutions, preventing awkward visual stretching or pixelation when moving windows between monitors.
Sources: support.microsoft.com
6. Taskbar Configuration and Future Upgrades
To finish your dual-monitor setup, you can customize how the Windows taskbar behaves across both screens. Right-click on your taskbar and select "Taskbar settings." Scroll down to the "Multiple displays" section, where you can toggle "Show taskbar on all displays" on or off. You can also configure whether taskbar buttons appear on all taskbars or only on the taskbar where the active window is open, helping keep your workspace organized.
Keep in mind that software requirements and operating system support change over time. It is important to note that official support for Windows 10 will end on October 14, 2025. After this date, Microsoft will no longer provide free software updates, technical assistance, or security patches through Windows Update for Windows 10 devices. While your dual-monitor setup and PC will continue to function normally past this date, upgrading to Windows 11 is highly recommended to ensure you continue receiving critical security updates and access to newer display management features. Be sure to verify active support timelines and hardware compatibility rules with official documentation, as support policies can occasionally be updated.
Sources: support.microsoft.com, support.microsoft.com